
5 Critical Checks to Perform After the Holiday Break
By Jake Quesenbery, Aftermarket Coordinator
It’s February and by now you’ve settled into your daily work routine after coming back from winter break. Or perhaps you worked over the holiday. Regardless, it’s easy to get sidetracked and forget about robotic maintenance upkeeps.
Fortunately, Aerobotix is here to remind you of five critical things you may have overlooked since the break:
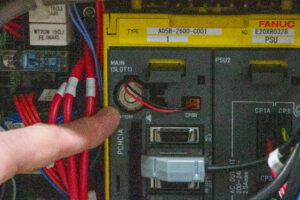
1. Batteries – Encoder & Central Process Unit
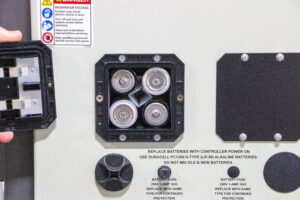
Energy supply is crucial for a robot. If neglected, not only will you lose power to the controller but inadvertently lose mastering—which is why we recommend you do it annually.
In no specific order, the Encoder Batteries* can be easily replaced. Just like toy batteries, simply pull them out and put the new ones in. The Central Process Unit (CPU) battery*, however, is a little trickier due to the connectors. Make sure to unlatch the battery and gently disconnect it before connecting the new battery and latching it into place. If the battery is improperly connected or disconnected for a prolonged period of time, an interruption in or loss memory back up may occur.
*For battery specifics we recommend reaching out to ABX.
Note: Before you begin the process, make sure to turn on the controller and leave it on.
2. Mastering
Mastering a robot keeps a load of trouble off your back. If ignored, the loaded paths won’t function properly.
When you get ready to master, make sure the robot is in its zero position, along with its rail system. The rail system is in its zero position when aligned with the mastering hole location.
Note: It helps to remove the End of Arm Tool to see the witness marks. We also recommend setting up a Zero or Mastering position program to help with periodic checks.
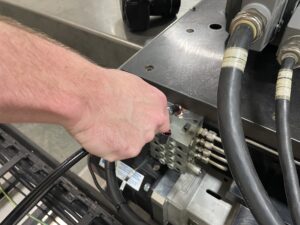
3. Connections – Cables & Hoses
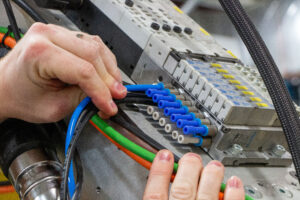
Over time, cables and hoses undergo wear and tear. While it may seem tedious, it pays off in the long run. Look for cracks, faded color (may indicate thinning of the tube), loose connections, etc. In the end, you avoid a number of problems, such as, losing pulse, power and/or encoder functions.
Cable management is crucial!
4. Grease
It’s no grease lightning, but it still makes our Top 5 List.
We recommend you grease your gear rack, felt pinion and bearing trucks every three months. Additionally, it helps to do the robot per the manufactures recommendation.
Note: Make sure to check your rail provider’s manual or call them for proper grease usage.
5. Wipe Down
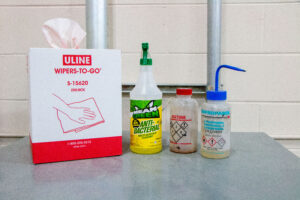
Lastly, a little TLC never hurts. To help keep your robot’s exterior in pristine condition, a simple top-to-bottom wipe down is all that’s needed.
Here’s what we suggest using: all-purpose cleaner (for dust), acetone or isopropanol ( for massive paint build up), and a box of wipes.
For more information regarding maintenance or training requests, contact Aftermarket Coordinator Jake Quesenbery by submitting a form below.
robot, robot batteries, robot clean up, robot connection, robot grease, robot inspection, robot maintenance, robot mastering, robot painting, robot system